12 May, 2014

Solar panel mount

We would like to use a compressor fridge on our boat, but that needs some power from the batteries. I've already installed the new charging coil in the outboard, but still we need more power especially during the sunny days. So we decided to install the solar panels around 50W of peak power. On the previous boat we had the solar panel mounted on the top of the cockpit arch, but this small boat does not have it and we don't plan to install it.
The best flat location is the area in front of the companion sliding hatch board so I will give it a try.
There could be just one more issue and that is the shade from the boom. The problem with the solar panels is that when only one solar cell is in the shade or dark the whole current of the panel is degraded. This is why I don't want to mount the panel permanently (I mean new holes in the boat) at this moment. Polyurethane glues are pretty hard to remove so I've searched the net and found the 19mm 3M VHB acrylic double sided tapes 49xx series which are UV and weather resistant.  Declared holding strength is around 6kg for 30cm of the tape which should be enough, since I will use 2x 40cm on the aluminum L-profile which will then hold the 5kg solar panel.

At first wanted some cool marine flat solar panels that could fit the desired area, but they are pretty expensive, but finally I bought the Victron Energy SPP51-12 50Wp polycrystalline panel with the dimensions of 540x670x35mm. As the charger I bought the Victron Energy BlueSolar MPPT 75/15, not cheap, but the best thing about this is that its all encapsulated electronics and suitable for marine use. This charger will be used also for the outboard charging and will be mounted in the new battery compartment in the cockpit.

Here you can see some photos of the installation itself.

back of the panel with the 2x2cm L-profile rails 40cm long and 3M tape installed

deck connected - 3 terminal (4x 1mm2)

Man, cables from the distribution panel to the mast step is almost impossible to pull through. The inner fiberglass is on some places mounted together with the outer skin so tight that it's impossible to install new cables here without drilling some kind of inspection holes. Luckily I was so wise and ordered 2x double line cables as a spare. Factory installed 4x 1mm2 which is too narrow diameter for the DC currents from the solar panel without significant voltage drop. So I put them together in parallel so the final profile is 2x 2mm2. Then I was able to install the 2,5mm2 cable from the distribution panel to the battery behind the carpeting which was not that easy anyway.
The boat is nice as you don't see any screw heads and all looks clean, but installing something additionally is a pain.
cables to the deck connector on the left (on the right is for mast lights)


final connector glued with sikaflex


final placement

screws holds the panel in place

The holes for the M6 screws are just tapped in the aluminum panel frame so the panel can be easily removed and stored inside the boat.
The future will tell how good this installation is but if not, I can move it to somewhere else, probably stern rails, and use the second mast connector for anything else.

Updated 5/20/2016: I've found out, that the deck connector was some kind of a fake cheap copy which lasted only one season. Its contacts totally corroded so I've replaced it. See my upgrade of the solar panels here.

28 April, 2014

Cockpit lockers upgrade I.

The stock boat has the preparation for the battery in the middle cockpit locker. The starboard locker has separate space for a flexible water tank and the port locker is completely empty without any preparation.
Since we don't have a flexible water tank, I decided to enhance the balance of the weight in the cockpit. That means to relocate the heavy 24kg 90Ah battery to the starboard locker and install the 23L fuel tank into the port locker.
This relocation result in a completely free middle locker which can be used for bulky items like fenders, spare anchor and so on.
The problem is that I have to build shelves for this item.

This is a shelf for the battery in the starboard locker made from the marine 10mm plywood:

battery shelf - 10mm plywood
additional support for the battery shelf
shelf in place
I don't have more photos from laminating, so I can only say that I've sanded the gelcoat a bit and then laminated with epoxy and two layers of glass cloth. Then I've painted it with one coat of white gelcoat. I'm now waiting for gelcoat wax (5% paraffin solution in styrene) that will be added into gelcoat and paint the last non-tacky top-coat layer.

one coat of gelcoat of battery shelf

The port side locker is made the similar way with dimensions for this vertical gas tank

23L gas tank

gas tank shelf in the port locker
Then I'm going to attach the holding straps and finalize the electrical wiring - battery shunt, solar and shore power charger.
In the mean time, I've installed some new wires from the 12V switch panel back to the battery for the solar charging and for the battery monitor.

So stay tuned for more soon, hopefully.

Companionway hatch board storage

The boatyard offers the holder for the companionway hatch board behind the toiled as an extra, but as I can build it by myself I wanted to save some money for other options.

Anyway, I get some old piece of oak cut 3 identical pieces and then used a router to do a slot for the board and rounded corner.


This is the final installation as I glued and fastened in place. The holes for the fasteners were then hidden by an oak plugs.


The only problem was to find the similar varnish. The Dalpol uses HERLAC Kontracid D 1173 Q polyurethane varnish with satin finish, but it's hard to find it here and even in a small package, because it's used for mass production finishing. So far I've found that INTERNATIONAL Goldspar Satin gives almost the same finish. I've applied two coats by brush followed by wiping with a clean rag. This give's you almost like spray satin finish.

Alcohol stove installation

My wife loves coffee, so her first question when we planned our boat was: When do you install the stove? Well, it will be used also to cook some delicious meals so it needs to be fast anyway.
Originally we planned to install the propane fancy double cook-top with integrated sink, but then we realized it's too expensive to build it properly according to industry standards and maintain in the terms of propane bottle installation and servicing fees. Yes of course, you can put the bottle in the anchor locker, but it's not allowed there with the anchors and chains and so on. It's simply too risky to have a propane inside the boat.
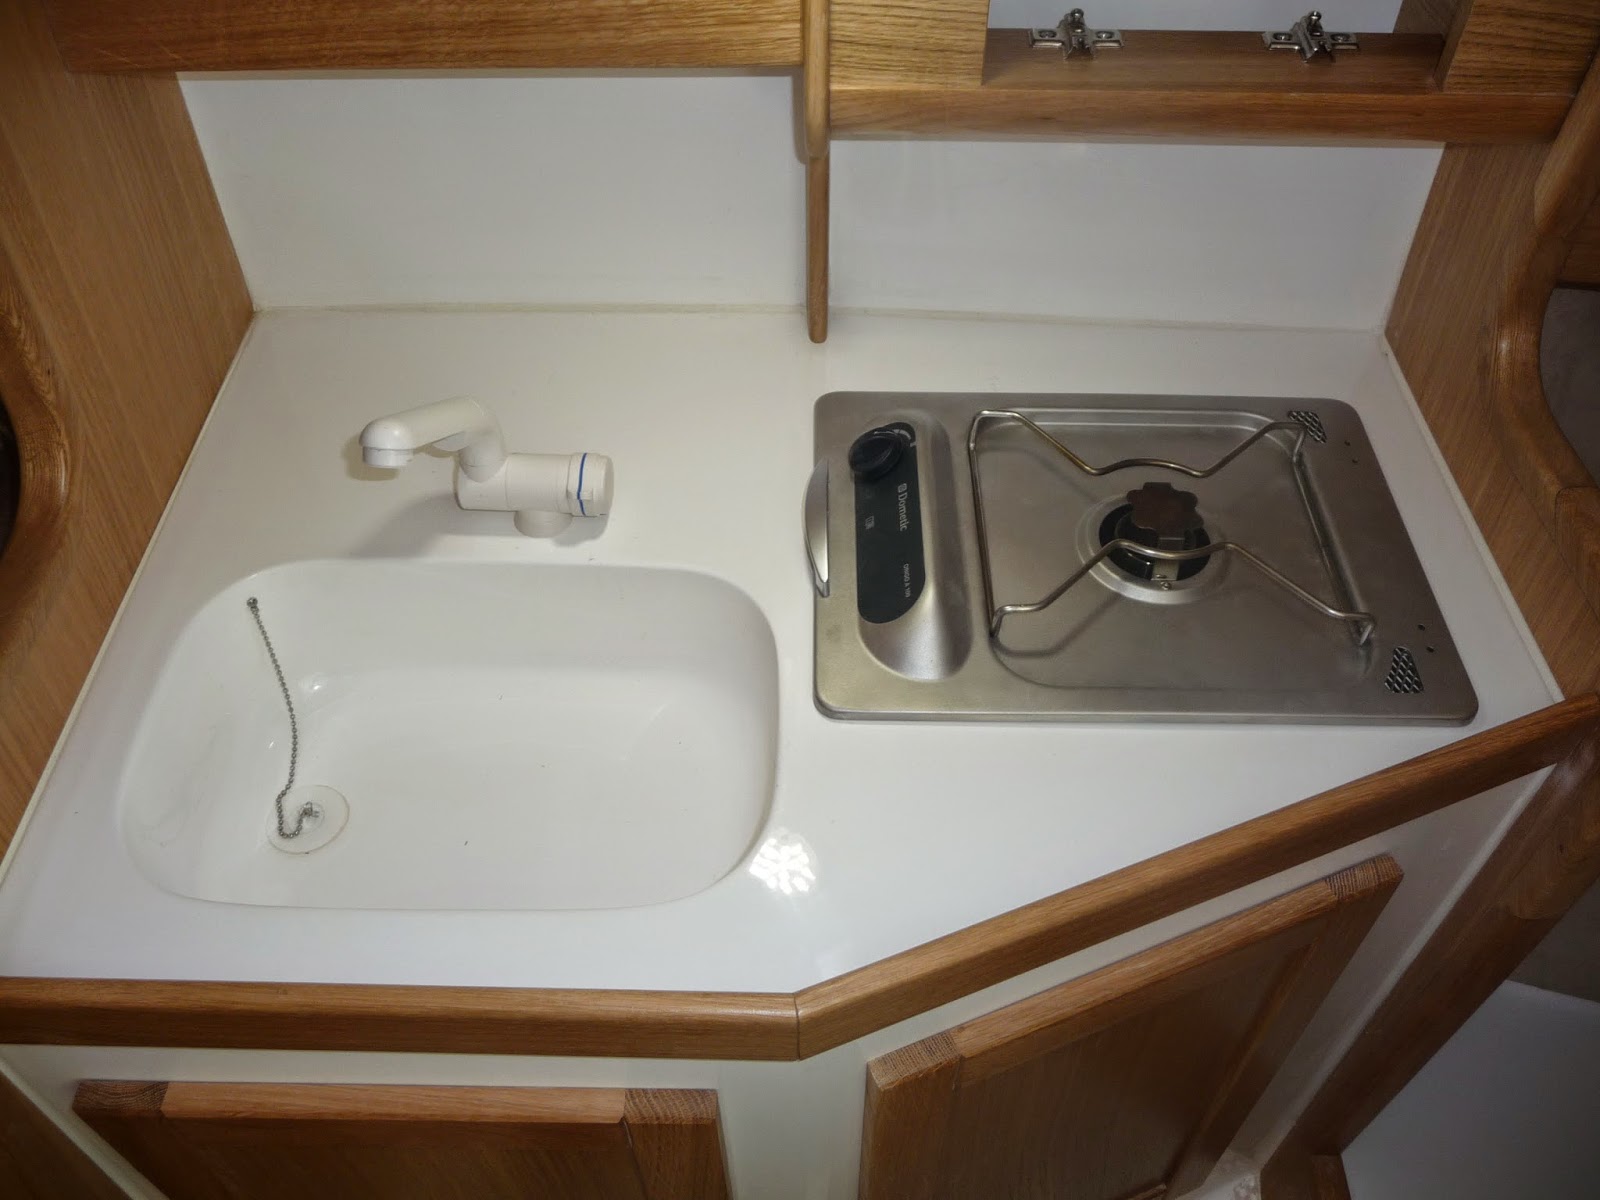
So we choose the other possibility which is an alcohol stove. At first we wanted a double stove, but the galley desk is too small, so we decided for the Dometic Origo A100 flush mount single stove.

The first step was to create a template for cutting the hole needed for the stove. The manual describes an unnecessarily bigger cutout, but I made it just enough for the proper installation.

cardboard template
The next thing was to cut the hole. I drilled pivot holes in the corners and then cut the hole with the electric jigsaw.

final hole with the slot for the magnetic lock
The next problem was the opening hinges. Because I cannot open the stove to a full 90 degrees due to the upper cabinet I was not able to fasten the hinge to the galley. So I added an aluminum L profile to the hinge with the flush mount rivets so the fastening holes are now from the bottom of the galley


closeup of the modified hinge

Next I had to move the position of that holding plate, but that was easy. So now it's almost finished. Just waiting for a gelcoat/topcoat paint of the cutting.


Tadaa... ready for meals... ehm coffee :-)

Inspection hole

Before I can install the depth & speed instrument, I need to drill the inspection hole under the port seating. This is because I will need to see what is really there and mainly to pull through the power and transducer cables. It's also good to have access to this keel area just in case.

Since the boat is in the yacht club, I need to carry all that tools and this is how it looks:


The drilling was pretty straight forward. I simply draw the circle with the diameter smaller by the half width of the drill bit. Then I drilled one 6mm hole to each other. Then I took the metal saw blade to cut the hole and finished it with a smooth file.

measure twice, drill once

dry test of 170mm inspection hole (140 mm hole)

Here you can see through the hole inside the bilge area. The dark color of the bilge area is the encapsulated lead ballast.

key hole view - water inlet and vent & pump feed

centerboard view

The transducer cable will go this way to the sink cabinet in the toilet room:

beautiful eye :-)

final look

24 March, 2014

Upgrades

We are quite busy now with other stuff, but I'm almost finished collecting the new technical and safety equipment for our boat.

One of the last thing is the fridge. We have not decided yet what to choose. This is a pretty small boat, so every free space is a good space, but a compressor fridge is a must. We will probably buy some portable around 20-25 liters and put into the middle cockpit hatch, but first I need to relocate the battery from this hatch to the starboard hatch.
The next thing is to install the fuel tank & hoses, solar panel, battery charger (solar, shore & outboard), battery monitor, depth and speed sounder and a few small accessories. As soon we will get the boat from the dealer's storage, I'm planning to document here all the major tasks.

Spring is getting fast and we can't wait for the first launch.

30 January, 2014

Tough race

I was just reading the report from the last Phobos Cup 2013 held on Masurian lakes in Poland. It's organized by Dalpol Yacht where everyone in the Phobos class boat can attend. Then I found some really interesting video where Phobos 21 called "Gęgawa" unwillingly (?) attacks the Phobos 24 during this race.


Probably the skipper of that "angry" P21 just lost control over the boat. This must be a tough race :-)

28 January, 2014

Boat name

The boat is on the trailer and stored in a dealer's garage until its officially registered.
Anyway, we decided to name her "SOLE MIO", which means "my sun" in Italian, but also contains the initials of our two children Simon and Lenka.

Since we had a Catalina 25, which was a great boat, there was a little time we wanted to name her Catalina. Then we had to change it to something else to distinguish her in the family talk.
Our previous boat was named by the first owner as "High Anxiety",  but as I don't rename the boats and its quite hard to pronounce it properly here, so we always called her Catalina anyway.

The boat naming ceremony will happen on the first launch so it will have to wait till the spring.


13 January, 2014

Finaly delivered!

Hurray! The boat is here.

Since the initial order it took a little over 3 months to build her, sometimes a little stressful to get everything in order, but this part of our dream has finished.
From the Craft Identification Number (CIN) it seems our hull is number 27.
The only problem was with my trailer. It turned out that the keel rollers are too low and the boat would hit the trailer fenders, so it needed some modification.
One last thing before the boat registration is to decide the boat name. Not final yet, but getting there.
Enjoy some photos of the final state.

mast transport "pillows"


younger daughter with her baby loves this boat :-)


boom with lazy-bag and main sail


genoa sail bag


head wall - spot for paddle and stuff


very nice wood work

Kitchen needs some cooktop, probably Origo A100.


Normally, under this shelve there is a flexible water tank. I think this is a good spot for a gas tank

battery locker

outboard motor bracked in the running possition


setting up my trailer