07 September, 2016

Building custom instruments pod

A friend of mine Jirka, with his own Phobos 21 called "Lente" build this custom instrument pod on the top of the companionway hatch.


So with his kind permission I'm sharing his building process.

He used the 3mm ABS board laminated with an acrylic film. These boards are often used as an advertising sign.
Then he formed the curves using the hot air gun (around 200°C). Side walls are glued and then polished. Finally, it has been straightened inside the pod using the fiberglass and epoxy.


paper template

gluing the side walls

template for the instruments holes

finished pod with fiberglass reinforcement

installed instruments

finished pod (depth, compass, wind)

If you have any enhancements, please don't hesitate and send it to me. I would be more than happy to share it. Phobos 21 is a wonderful class.

23 May, 2016

Centerboard noise reduction

I call this post a noise reduction, but it's more like a hummer banging reduction that centerboard produce when you are cutting through the waves.
That's because the centerboard iron plate has too much play in the trunk, almost 10 mm on each side and when the boat heels to the opposite side, that small gap can make noticeable banging sound.

Searching through the internet, I've found several solutions like a piece of rubber or stainless steel spacers with HDPE sliding pads as on Avar Yacht A25 of a friend of mine:

Avar Yacht A25 centerboard spacers -
two pairs in front and back of the steel plate

This is the stainless steel centerboard used on TES 678, but same design is used on Phobos yachts:

TES 678 staineless steel centerboard

However, last year we met a sailor with his older Phobos 24 and he fixed it with just an ordinary carpet. It did not sound very marine solution, but he told me he has it for more than 6 years without any problems.

Luckily we have a trailer with two support bunks so I can reach the centerboard trunk easily.
Using the hot-knife a.k.a. modified soldering iron, I cut two 2cm wide and 1m long stripes of the ordinary fully synthetic carpet and glued it with Sikaflex 291i covering the area starting just behind the centerboard pin to the end of the centerboard.

centerboard with carpet on the walls

detail of the carpet
The banging sound disappeared completely so we can now enjoy the silent nights with a dropped centerboard.

20 May, 2016

Solar power extention

During our trip in the hot Adriatic seas, we have found out, that our actual 50W solar panel is not sufficient to be ultimately shore power independent. During that hot summer days we were able to keep the fridge running only for like 12 days before I had to recharge the battery from the shore.

One of the issue that was that our boom tent partially covered the panel during the day, so it has prevented the proper function.

So I've decided we need more solar panels. The question is the where to place it?
At first I was thinking putting them to the mast support or on the backstay.

solar panel on the aft mast support

solar panel on the backstay

However all these positions needs some maintenance and I think it's not really handy for a trailer-sailor when you need to simplify all the mast raising/lowering tasks.

A final decision was to get the semi-flexible panels and put them on the top of the cabin. The only possible free area for them is besides the mast base. Due to area limitation I was able to find these two suitable 20W ETFE semi-flexible panels from China with dimmensions of 600x300x2.5mm. You can also walk on these!

20W EFTE semi-flexible panel - model LS-20FX1

The installation is again drill-less using the 19mm 3M VHB acrylic double sided tape 49xx series, which has already proved to be working very well even on our hollow non-skid surface. It's just needed to degrease the surface with the isopropyl alcohol.

3M VHB double sided tape on the back of the panels

final placement

final placement
The next task was to create a junction box. I've created a simple circuit board inside a plastic junction box and glued it carefully under the existing 50W solar panel using Sikaflex 291i. It's important that this junction box is completely watertight to prevent any corrosion.

With parallel connected panels, each string to be connected in parallel should have its own blocking diode. This prevents current flowing from one parallel panel into a lower-current panel (shaded) and therefore helps to minimize mismatch losses arising in parallel connected arrays.

The best blocking diodes are Schottky's rectifying diodes like SB540 or similar. They have lower forward voltage drop around 0.3V instead of regular rectifying diodes which has around 0.7V.


junction box scheme with blocking diodes 

The new 20W panels are equipped with cables including the MC4 connectors already, so I've just bought two 1m long extension cables with MC4 connectors, cut them in half and used them as an input connectors.

inside the junction box

One hint here: to protect the circuit board from corrosion, it's necessary to coat the copper and the components with soldering rosin (flux) soluted in alcohol.

junction box glued with Sikaflex

The last step was to replace the old deck socket I've installed before. I bought some cheap China copy and the contacts corroded very badly just after a first season.

So I've decided to use some better connector with gold plated contacts and decided to use these type from Philippi Marine. You can also buy just the angular housing from Philippi and cheaper Weipu WA22 type connectors, which are not labeled "marine" as a primary use, but I believe it's the same quality - gold plated 16 Amps! That's what I did.

Weipu WA22 IP67 16Amp connector

The first test looks very promising and I hope that with a total of 90W, we will be shore power independent, at last.

28 April, 2016

3D model and panoramic view

The Dalpol boatyard has just released a 3D model of their sailboats. It's not very accurate compared to the real boat, but still cool. Check this Link to page if the preview bellow does not work.


This is the 360° panoramic view of the charter version:


and the deluxe version:


More information on the official website.

25 April, 2016

Water tank modifications

The factory water tank installation, we have in the bow, had a few issues I wanted to address.
At first, the water tank is not horizontal and the front of the tank is slightly raised due to the shape of the V-berth storage, but tank vent is on the lower side of the tank. That leads to an air pocket and we could not fill the whole tank (54 liters).

The second problem is that water pump. Under certain amount of water, it's unable to pump out the every lasts of the water, leaving around ~5 liters in the tank.

Original tank vent and pump

The third problem is the supply hose. It's going from port side and because it's just laying without proper installation, this "arrangement" creates puddles of the stinky water. Not even helping the winterizing process.

Original vent & fill hose "alignment" problems
So the first step is to relocate the tank vent to the most top it could go. I simply used slightly modified plastic thru-hull near the edge of the tank.

New ventilation hole - modified plastic thru-hull 

Then routed a new vent hose on the top of V-berth storage and installed the new water pump Vetus WP1208.

New vent hose
During the electrical installation, I've found out another "bug". I know that the boat does not fully meets the marine standards for wiring, but this .... ??

Shame on you Dalpol electrician!

The water pump has a pressure switch which can be used later, when we would like to have a stern shower or something similar, however we have the faucets with the electrical switch already, so there is no need for it now.

And this is the final installation with the proper hose alignment allowing us to have more water on board :-)

From the top: vent, output & intake

Fill hose and vent hose (behind) properly secured
The last benefit of this modification is that the output hose is now going to the top of the storage locker and not from the bellow as was originally installed, so when there will be some water ingress from the depth sounder, it will not flow around the whole hull and stays in the locker.

Updated 24.10.2016 - To prevent the frequent starts of the pump and to increase its service life, I've installed the small accumulator tank under the sink in the galley. It's connected directly to the hose which leads to the galley faucet.

expansion tank

07 April, 2016

Sliding hatch fix

Since the beginning, we have observed that under heavy rain, the water gets its way into the cabin though the sliding hatch. The problem was later identified as a manufacturing flaw, because the beneath of the hatch is not flat and drops coming from the edges of the hatch flows back to the cabin.
The other issue is the weak corners and after a few months of light use, the front corners cracked against the ends of the sliding track.

The problem is the small thick of the laminate on the lips with the soft Airex coring behind. So I've decided to remove small piece of the coring and fill it with thickened resin.


Here you can see the cracks on the corners (gelcoat already sanded)

Weak hatch corner without core.

With masked underneath I've filled the gap with thickened resin.

Final stage painted with gelcoat and buffed.

To fix the water intrusion, I've installed 4mm height self-adhesive brush pile seal on the track of the sliding hatch. The other benefit is that I can now slide the hatch very easily.
The second brush seal track was also added at the edges of the sliding hatch, which helps the water to drop off the on the edge of the hatch.

Brush track.

Seal is working just fine.

This is the view under the sliding hatch cover.

15 January, 2016

Hull vinyl wrapping

This is a nice example, how to change the color of the hull pretty fast and easy.


I'm not sure about the price, but it will protect the hull from UV rays and I can imagine changing the hull color every two or three years :-)

24 December, 2015

Christmas gifts

This year's Christmas were rich in marine gifts for our boat so I would like to share some interesting ones with you.

Special anchor for rocky shores with a railing holder. This kind of anchor is very handy on rocky shores like on Adriatic sea in Croatia. Simply throw the anchor to the shore and it will grab immediately without need to leave the boat. I think it's not very secure for strong winds, but the local people use it to ease the anchoring during a day when single handed. You can always put a piece of chain over the rocks afterwards for the overnight stay.

The boat name on the stainless steel anchor

Anchoring / mooring reel with 50m of the line and the Ronstan 60 series continuous-line roller furler and the anti-twist rope for an additional sails.
 
Anchoring/mooring reel, anchor, roller furled & anti-twist rope

We are planning the additional Gennaker, Blister or Code-0 for the next season, because there is no other
worse experience than staying boat when others are moving :-)

However, this Ronstan 60 series is not a top-down system so we have to buy a sail with straight luff and let the anti-twist rope sew in. More on this on the next post.

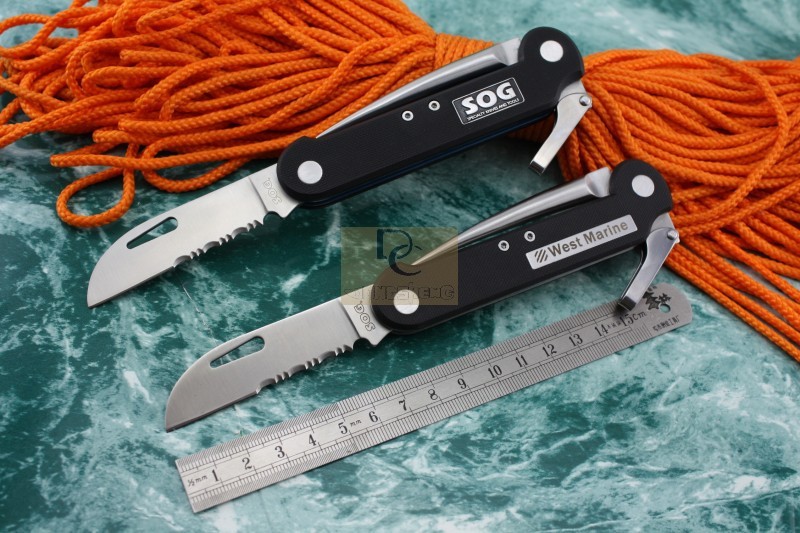
SOG FF23-CP Nautical knife

A nautical knife like this SOG FF23-CP is a no-nonsense lock back design with a rescue-style blade, marlin spike for rope work. Ordered directly from China. Every mariner should have some handy knife on board in case of emergency. The question is not if you will ever need it but when!

The last gift was the head flashlight and some accessories. This is however a subject of the next post.

Marry Christmas and Happy New Year ! 

01 December, 2015

Skipper Tomas' guide to winterizing

The winterizing process is commonly discussed among the sailors so I would like to put together all important steps I do on our boat. Over the years I own the boats I came to a resolution that all systems on the boats has to be extremely simple, reliable and of course very easy to maintain, because we want to sail more than doing an unnecessary maintenance.

Cover
  • I think it is important to keep the boat dry over the winter season so parking it in a garage is the best but putting over some heavier tarp is a minimum. Personally, I have a tarp made from a material used for truck trailers, which is around 500g/m2. Yes, it's heavy, but will last more than 1 year and protects the boat perfectly
  • To avoid wear through by various sharp hardware or stanchions always puts over some piece of protective material like carpet leftovers. On the picture below, you can see that I've used plastic plumbing tees on the top of the stanchions.
  • I always build some kind of netting from side to side to prevent the build up of water pools on the tarp.
  • Support the mast properly in case of heavy snow.
  • Additional mast support in the cockpit and the rope netting
  • To prevent the water condensation I always keep the front hatch open a little to provide some ventilation, but it's necessary to put over some bug screens.

Electronics
  • Remove battery from the boat, store in a dry basement and charge it once after two months or so. 
  • Take home all portable electronics or remove all batteries from it.

Cabin's junk
  • It's always a good idea to clean the boat, because you will always find some nice pieces of forgotten food or any other bio materials which just attracts the mold or ants.
  • Remove all chemicals which could be damaged by freezing temperatures.
  • Take home all the clothing and sleeping bags. Everything that can absorb moisture can produce stinky odors.
  • Take home cushions or store on their sides.

Water systems
  • Put a cup of bleach into the water tank and let it sit. 
  • Empty the water tank completely, including the water pipes. You can use a non-toxic antifreeze based on propylene glycol, but it you don't have complex plumbing, it's just expensive and won't save you much time.
  • Clean the water tank from inside. This is a substantial difference over the flexible water bags!
  • Empty and clean the chemical toilet.

Sails
  • Sails are the main engine of the boat so they need care so clean them if necessary
  • Put them off the furler, fold them properly into the sail bag and bring them home.

Engine
  • It's better to take off the outboard from the bracket to avoid unnecessary stress on the stern.
  • Change the motor and lower unit gear oil - according to the manufacturer manual.
  • Spray some fogging like oil into the cylinders.
  • Empty the fuel tanks in the car or pour in some fuel stabilize.
  • Desalinate the engine cooling using a mild vinegar solution.

Trailer
  • Check for corrosion and touch up if necessary
  • Jack it up on some stands to ease the load on the axles and tires.


  • You can also check that all the lights are working and the wheels are spinning without any noise or other issues which you can address during the winter time.
  • Check the hand-brake if it works properly.

As you can see this is not a rocket science, so having only a simple system on the boat helps you to spare some time to other aspects of life.

08 October, 2015

Lipno lake 2015

After the 3 weeks in the salt waters of Adriatic sea, we had one more very sunny week during the summer and went again to Lipno lake. We love it, especially the local nature and beautiful atmosphere.
This year we decided to launch the boat in the private marina YC Černá v Pošumaví. The local harbormaster was very kind and helpful.
I have to point that the last trailer modification I made proved it very handy, especially on a gentle slope so I had just to lower the after roller and support pads and the boat went off the trailer easily.

This year we bought a real marine clothing so when we used it one night the storm struck from sudden, I was more than happy we have it. Unfortunately, we had to re-anchor that night to the other side of the island and I missed a good light a lot.
After this experience I decided I really need a bright light on board so I bought the LED flashlight Fenix UC35. It's a waterproof and rechargeable flashlight with an integrated charger using the standard USB. The beam is pretty wide and strong for a single LED diode so searching for a good spot to drop anchor will no longer be an issue.

A few more photos from the trip:

Leaving the dry dock

Phobos 21 and WV Beatle .... both with trailer!


Mast or something


Blueberries, the forest was dry, not much to find

Blue teeth

Caught without the rod

Frymburk


Beautiful daysailer - Saffier Se 26

Statue of Lipno

Notice the cool windex


Marina Lipno

Marina Lipno

Lipno Marina and the Fish fountain

Cableway to the treetop walkway

Lipno treetop walkway


Wild nature

This used to be a car?


Kid's playground ... notice how tidy the boat is :-)

Slip at YC Černá v Pošumaví

Preparing to go home

Panorama from one of the most beautiful bays on Lipno.

Adalbert Stifter cruiser boat and its big wave

The GPS log from the trip is here

Sailtracker.cz log