The Dalpol boatyard has just released a 3D model of their sailboats. It's not very accurate compared to the real boat, but still cool. Check this Link to page if the preview bellow does not work.
This is the 360° panoramic view of the charter version:
and the deluxe version:
More information on the official website.
28 April, 2016
25 April, 2016
Water tank modifications
The factory water tank installation, we have in the bow, had a few issues I wanted to address.
At first, the water tank is not horizontal and the front of the tank is slightly raised due to the shape of the V-berth storage, but tank vent is on the lower side of the tank. That leads to an air pocket and we could not fill the whole tank (54 liters).
The second problem is that water pump. Under certain amount of water, it's unable to pump out the every lasts of the water, leaving around ~5 liters in the tank.
The third problem is the supply hose. It's going from port side and because it's just laying without proper installation, this "arrangement" creates puddles of the stinky water. Not even helping the winterizing process.
The water pump has a pressure switch which can be used later, when we would like to have a stern shower or something similar, however we have the faucets with the electrical switch already, so there is no need for it now.
At first, the water tank is not horizontal and the front of the tank is slightly raised due to the shape of the V-berth storage, but tank vent is on the lower side of the tank. That leads to an air pocket and we could not fill the whole tank (54 liters).
The second problem is that water pump. Under certain amount of water, it's unable to pump out the every lasts of the water, leaving around ~5 liters in the tank.
 |
| Original tank vent and pump |
The third problem is the supply hose. It's going from port side and because it's just laying without proper installation, this "arrangement" creates puddles of the stinky water. Not even helping the winterizing process.
 |
| Original vent & fill hose "alignment" problems |
So the first step is to relocate the tank vent to the most top it could go. I simply used slightly modified plastic thru-hull near the edge of the tank.
 |
| New ventilation hole - modified plastic thru-hull |
Then routed a new vent hose on the top of V-berth storage and installed the new water pump Vetus WP1208.
During the electrical installation, I've found out another "bug". I know that the boat does not fully meets the marine standards for wiring, but this .... ??
 |
| Shame on you Dalpol electrician! |
The water pump has a pressure switch which can be used later, when we would like to have a stern shower or something similar, however we have the faucets with the electrical switch already, so there is no need for it now.
And this is the final installation with the proper hose alignment allowing us to have more water on board :-)
 |
| From the top: vent, output & intake |
 |
| Fill hose and vent hose (behind) properly secured |
The last benefit of this modification is that the output hose is now going to the top of the storage locker and not from the bellow as was originally installed, so when there will be some water ingress from the depth sounder, it will not flow around the whole hull and stays in the locker.
Updated 24.10.2016 - To prevent the frequent starts of the pump and to increase its service life, I've installed the small accumulator tank under the sink in the galley. It's connected directly to the hose which leads to the galley faucet.
Updated 24.10.2016 - To prevent the frequent starts of the pump and to increase its service life, I've installed the small accumulator tank under the sink in the galley. It's connected directly to the hose which leads to the galley faucet.
 |
| expansion tank |
07 April, 2016
Sliding hatch fix
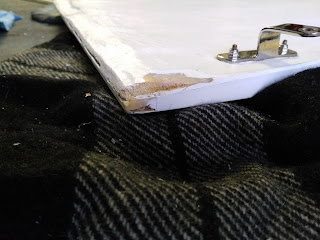
Since the beginning, we have observed that under heavy rain, the water gets its way into the cabin though the sliding hatch. The problem was later identified as a manufacturing flaw, because the beneath of the hatch is not flat and drops coming from the edges of the hatch flows back to the cabin.
The other issue is the weak corners and after a few months of light use, the front corners cracked against the ends of the sliding track.
The problem is the small thick of the laminate on the lips with the soft Airex coring behind. So I've decided to remove small piece of the coring and fill it with thickened resin.
 |
| Here you can see the cracks on the corners (gelcoat already sanded) |
 |
| Weak hatch corner without core. |
 |
| Final stage painted with gelcoat and buffed. |
To fix the water intrusion, I've installed 4mm height self-adhesive brush pile seal on the track of the sliding hatch. The other benefit is that I can now slide the hatch very easily.
Subscribe to:
Posts (Atom)


